Installation
Welcome to the Gympify Installation Guide! This documentation will walk you through the process of setting up a basic Gympify instance from scratch on a VPS (Virtual Private Server).
Upgrade Guide
To upgrade your existing Gympify installation, please follow the detailed instructions in the Upgrade Guide.
Quick Note
If you're looking to install Gympify on cPanel shared hosting, refer to the cPanel Installation Guide.
Server Requirements
To run Gympify efficiently, ensure that your server meets the following requirements. These include the web server, PHP version, necessary extensions, and database requirements.
Web Server
- Apache, nginx, or any other compatible web server.
PHP Requirements
- PHP Version: >= 8.2 (Recommended: Latest stable release of PHP 8.2 or 8.3)
- Required PHP Extensions:
- BCMath
- Ctype
- cURL
- DOM
- Fileinfo
- JSON
- Mbstring
- OpenSSL
- PCRE
- PDO
- Redis (for caching and session management)
- Tokenizer
- XML
- Imagick (for image processing and manipulation)
- ionCube Loader® v13.0 (Ensure the latest version is installed and compatible with your PHP version)
WARNING
The ionCube Loader is critical for running encrypted files. Make sure to download and install the appropriate loader for your server's PHP version.
Database
- MySQL: Latest version recommended (minimum MySQL 5.7 or MariaDB 10.2)
Recommended Configurations
For optimal performance:
- Use nginx as the web server for faster performance and scalability.
- Enable Opcache to improve PHP execution speed.
- Allocate sufficient memory (
memory_limit) in yourphp.inifile (e.g., 256M or higher).
Verify Your Server Setup
Run the following command to check your PHP environment and confirm required extensions are enabled:
php -m
This command will list all installed PHP modules. Cross-check it with the list above to ensure compatibility.
WARNING
This project utilizes the latest Laravel version (currently 12.x). Refer to the Laravel documentation for more information.
The root folder for Laravel is /public. Do not install it in a sub-folder; using a sub-domain is preferable over a sub-folder. We do not support installing our product in a sub-folder.
Download and Setup Application
To set up the application on your development machine, follow these steps:
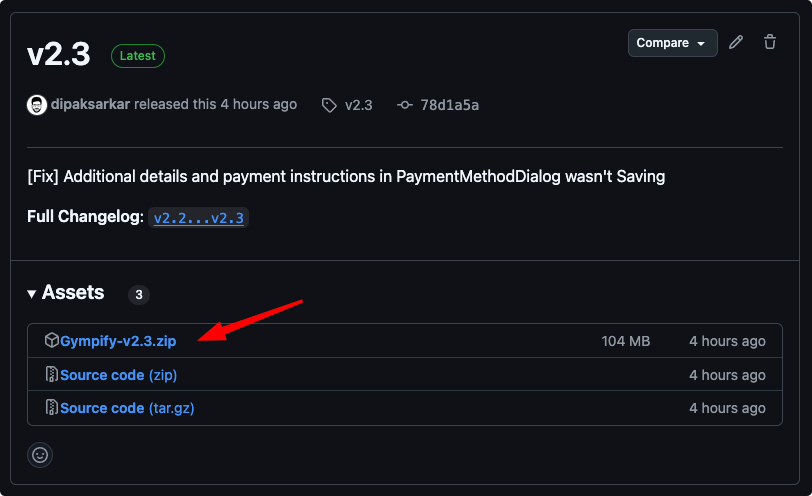
Download the latest version of Gympify:
Visit the GitHub Release page.
Ensure you are logged in with the correct account and have access to the repository. If you do not have access, please contact the repository owner.
Navigate to Assets and download Gympify_v2.6.1.zip.
Upload the zipped file to your server:
- Use an FTP client (like FileZilla) to upload the zipped file to your server.
- Unzip the file on your server. You can use the following command:bash
unzip Gympify_v2.6.1.zip - If you are using cPanel, you can unzip the file directly from the File Manager.
Copy configuration files:
Copy
.env.exampleto.env:bashcp .env.example .envCopy
.htaccess.exampleto.htaccess:bashcp .htaccess.example .htaccessUpdate the .env file:
Open the
.envfile in a text editor and update the following lines:bashAPP_DOMAIN=your-domain-name.comReplace
your-domain-name.comwith your actual domain name.
Setup Database & User
Follow these steps to create a MySQL user with appropriate privileges for managing the database using Gympify.
Step 1: Login to MySQL
Log in to MySQL as the root user on your VPS:
mysql -u root
Step 2: Create a User for Both localhost and % Hosts
Run the following SQL commands to create a new user and grant full privileges on the database for both localhost and any host (%). The localhost user will only be able to connect from the local machine, while the % user can connect from any host.
-- Create user for localhost
CREATE USER 'gympify_admin'@'localhost' IDENTIFIED BY 'your-password';
GRANT ALL PRIVILEGES ON *.* TO 'gympify_admin'@'localhost' WITH GRANT OPTION;

-- Create user for any host
CREATE USER 'gympify_admin'@'%' IDENTIFIED BY 'your-password';
GRANT ALL PRIVILEGES ON *.* TO 'gympify_admin'@'%' WITH GRANT OPTION;

-- Apply changes
FLUSH PRIVILEGES;
Replace 'your-password' with your desired password.
How to Get a License
To use Gympify, you need to obtain a valid license. Please refer to the How to Get a License Guide for detailed instructions on acquiring and activating your license.
One Click Installer
Start Installation
- Navigate to
your-domain-name.com/installto begin the installation process. - Follow the step-by-step installation wizard:
Step 1: System and Requirements Check
In this first step, the installer performs important checks:
- Verifies PHP version and required extensions
- Validates server configurations
- Ensures critical directories are writable
All items should display a green checkmark. If you see any red indicators, you'll need to resolve these issues before continuing.
Step 2: Database and Site Information Setup
Here you'll configure your database connection and site information:
- Database name, username, password, and host
- Site name and administrator account details
Step 3: Installation Process
During this step, the installer will:
- Connect to your database
- Create required tables
- Import initial data
- Configure core settings
Step 4: Installation Complete
Upon successful completion, you'll see a confirmation screen with:
- Success message
- Login instructions
- Your admin credentials
Add Cron Jobs
Cron jobs are essential for automating tasks like running scripts or triggering specific actions at set times. Add the following cron jobs to your server:
# Run Gympify scheduler
* * * * * /usr/bin/php8.2 {project-root}/artisan schedule:run >> /dev/null 2>&1
Make sure to replace {project-root} with the actual path to your Gympify project.
Setup Queue Worker
Systemd provides more robust control over the service, including automatic restarts and easier management.
Follow these steps to set up a systemd service:
Step 1: Create the Service File
Start by creating a new service file for your Gympify queue worker:
sudo nano /etc/systemd/system/gympify-queues.service
Step 2. Add the Service Configuration
Add the following configuration to the service file:
# This systemd service is responsible for managing the queue workers for gympify.

[Unit]
Description=Gympify Queues
After=network.target

[Service]
User=www-data
Group=www-data
Restart=always
ExecStart=/usr/bin/php8.2 {project-root}/artisan queue:work --sleep=3 --tries=3 --max-time=3600
RestartSec=5
StandardOutput=syslog
StandardError=syslog
SyslogIdentifier=gympify-queues

[Install]
WantedBy=multi-user.target
Make sure to replace {project-root} with the path to your Gympify project.
- User and Group: Ensure that the
UserandGroupare set to the user that your web server runs under (commonlywww-data).
Step 3: Enable and Start the Service
After creating the service file, run the following commands to reload systemd, enable the service to start at boot, and start the queue worker:
sudo systemctl daemon-reload
sudo systemctl enable gympify-queues
sudo systemctl start gympify-queues
Step 4: Check the Status
To ensure the queue worker is running properly, check its status:
sudo systemctl status gympify-queues